Ramps, Part 2
Intro
This is one in a series of articles I’m writing to describe the way I approach game design.
In this article, I’m going to show you a trick I like to use that helps me create good pacing in my designs.
I was originally planning on showing and writing about how this kind of pacing looks in a recently-released game (namely The Talos Principle), but it became a bit too much to handle for a one-week article. I’ve put pictures and my notes in the Appendix, so hopefully they will be useful for someone.
Ramps
A Ramp is a pattern of increases and decreases to Intensity over the course of a game segment, created with the purpose of achieving a desired balance between Intensity and Rest. I talk more about Ramps (which I called Intensity Ramps) in the previous article.
As you can see in the diagram below (from Jesse Schell’s The Art of Game Design: A Book of Lenses), Ramps are not linear slopes, but rather contain many peaks and valleys. As mentioned in the previous article, this is because of Principle #5: “If it’s always ‘turned up to eleven’, eleven becomes the new five.” In other words, if intensity does not vary between parts of a game, you effectively have no intensity.

Not every game will want the same kind of Intensity Ramping. Some will want a steeper overall curve, some will want a shallower one, and some may even want one that trends down in Intensity over time. When I’m designing part of a game, I create Ramps for many different purposes, but always with the goal of balancing Rest and Intensity in a way that best suits the game I’m making.
A Trick to Create a Ramp Using Archetypes
Learning the ABCs
As we’ve talked about before, Archetypes represent the extreme edges of your game’s design. To begin creating a Ramp, first I make a list of all the Archetypes I have available to me in the part of the game I’m currently designing and assign each one a letter. (The order doesn’t really matter that much for now.)
For example, let’s say I’m designing an early level of a game that uses the same kind of combat system we’ve been developing over the course of this series, except you can only attack by jumping on an enemy. It’s early-on, so let’s say my available Archetypes are restricted to these three:
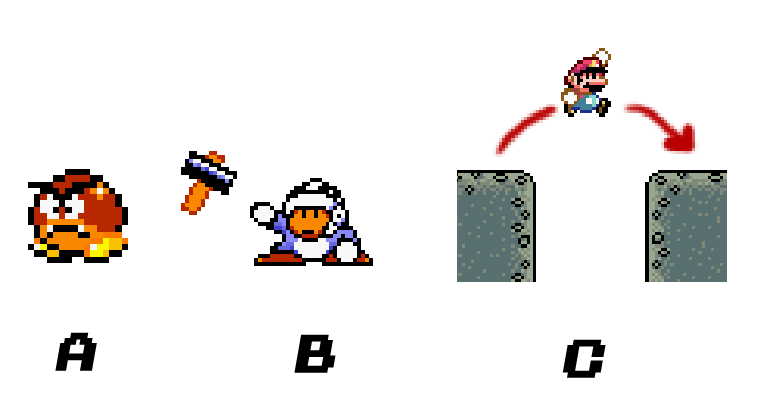
- Swarmer (Small, dies in a single hit, best in large groups)
- Ranged Enemy (Stands in one place and shoots at you)
- Terrain Gaps (You can fall in and enemies can shoot over it)
To create a Ramp out of these, I combine the letters in such a way that Principle #3 is always followed:
Principle #3: Let the player interact with your Questions and their Tools in a simple way before requiring them to interact with them in a complex way.
This means that when you combine the letters together, you must introduce each letter to the player in a simple way before increasing complexity.
Each group of letters, when you’re done, represents a Setup for you to design the specifics of. And the order of the Setups automatically Ramps in the way we just discussed.
Note: Additionally, it’s very important never to re-use a combination of letters within the same Ramp. If the point of this is to ask the player Questions, repeating the Question will get boring for the player very quickly. Fortunately, this method tends to give me more than enough setup ideas than I usually need for a single Ramp.
For example:
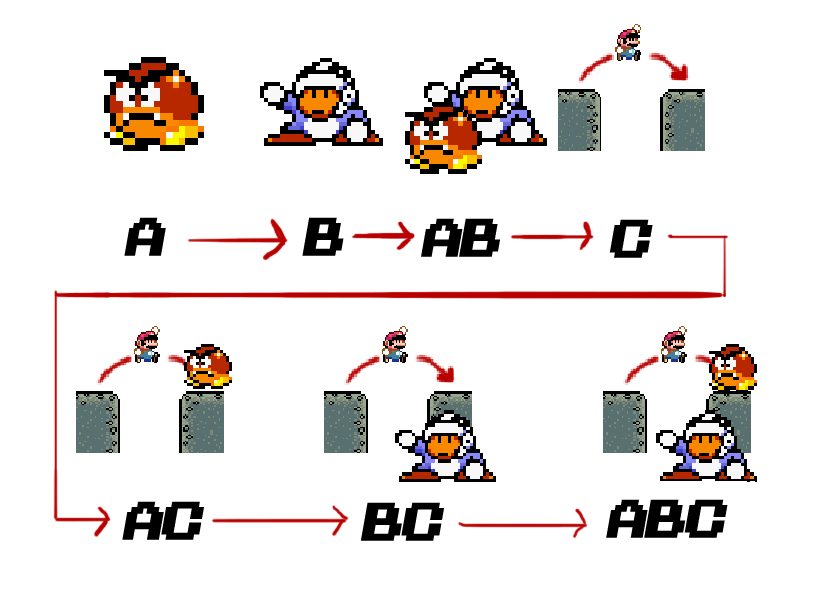
A | B | AB | C | AC | BC | ABC
Using this trick allows you to increase the intensity of your setups over time without having to first design all the setups out in their entirety. This tends to save a lot of time.
Note: The letter means “one or more of this archetype” – in the above example the first setup could be designed to have either a single enemy of type A, or many, and the pacing still works.
Rests
Principle #4: An intensity ramp is not a linear increase in intensity, but rather a “lumpy” one. Rest periods are as important as active periods.
In the technique I showed above, a good place for a rest is after you’ve combined some archetypes, but before you add a new one.
For Example:
A | B | AB | REST | C | AC | BC | REST | ABC
Designing Setups Based on the Ramp
Given the Ramp we’ve just created, I’ll now show you how I’d put it all together to design a Ramped series of Enemy Setups.
For simplicity, rather than creating a player and some weapons from scratch, I’m designing these assuming the player is small Mario from Super Mario World. Mario, when small, can run forward and backwards, he can jump, and that’s it. If he jumps on top of (stomps) an enemy, the enemy dies. If Mario is touched by an enemy in any other way, falls in a pit, or is touched by a projectile, Mario dies.
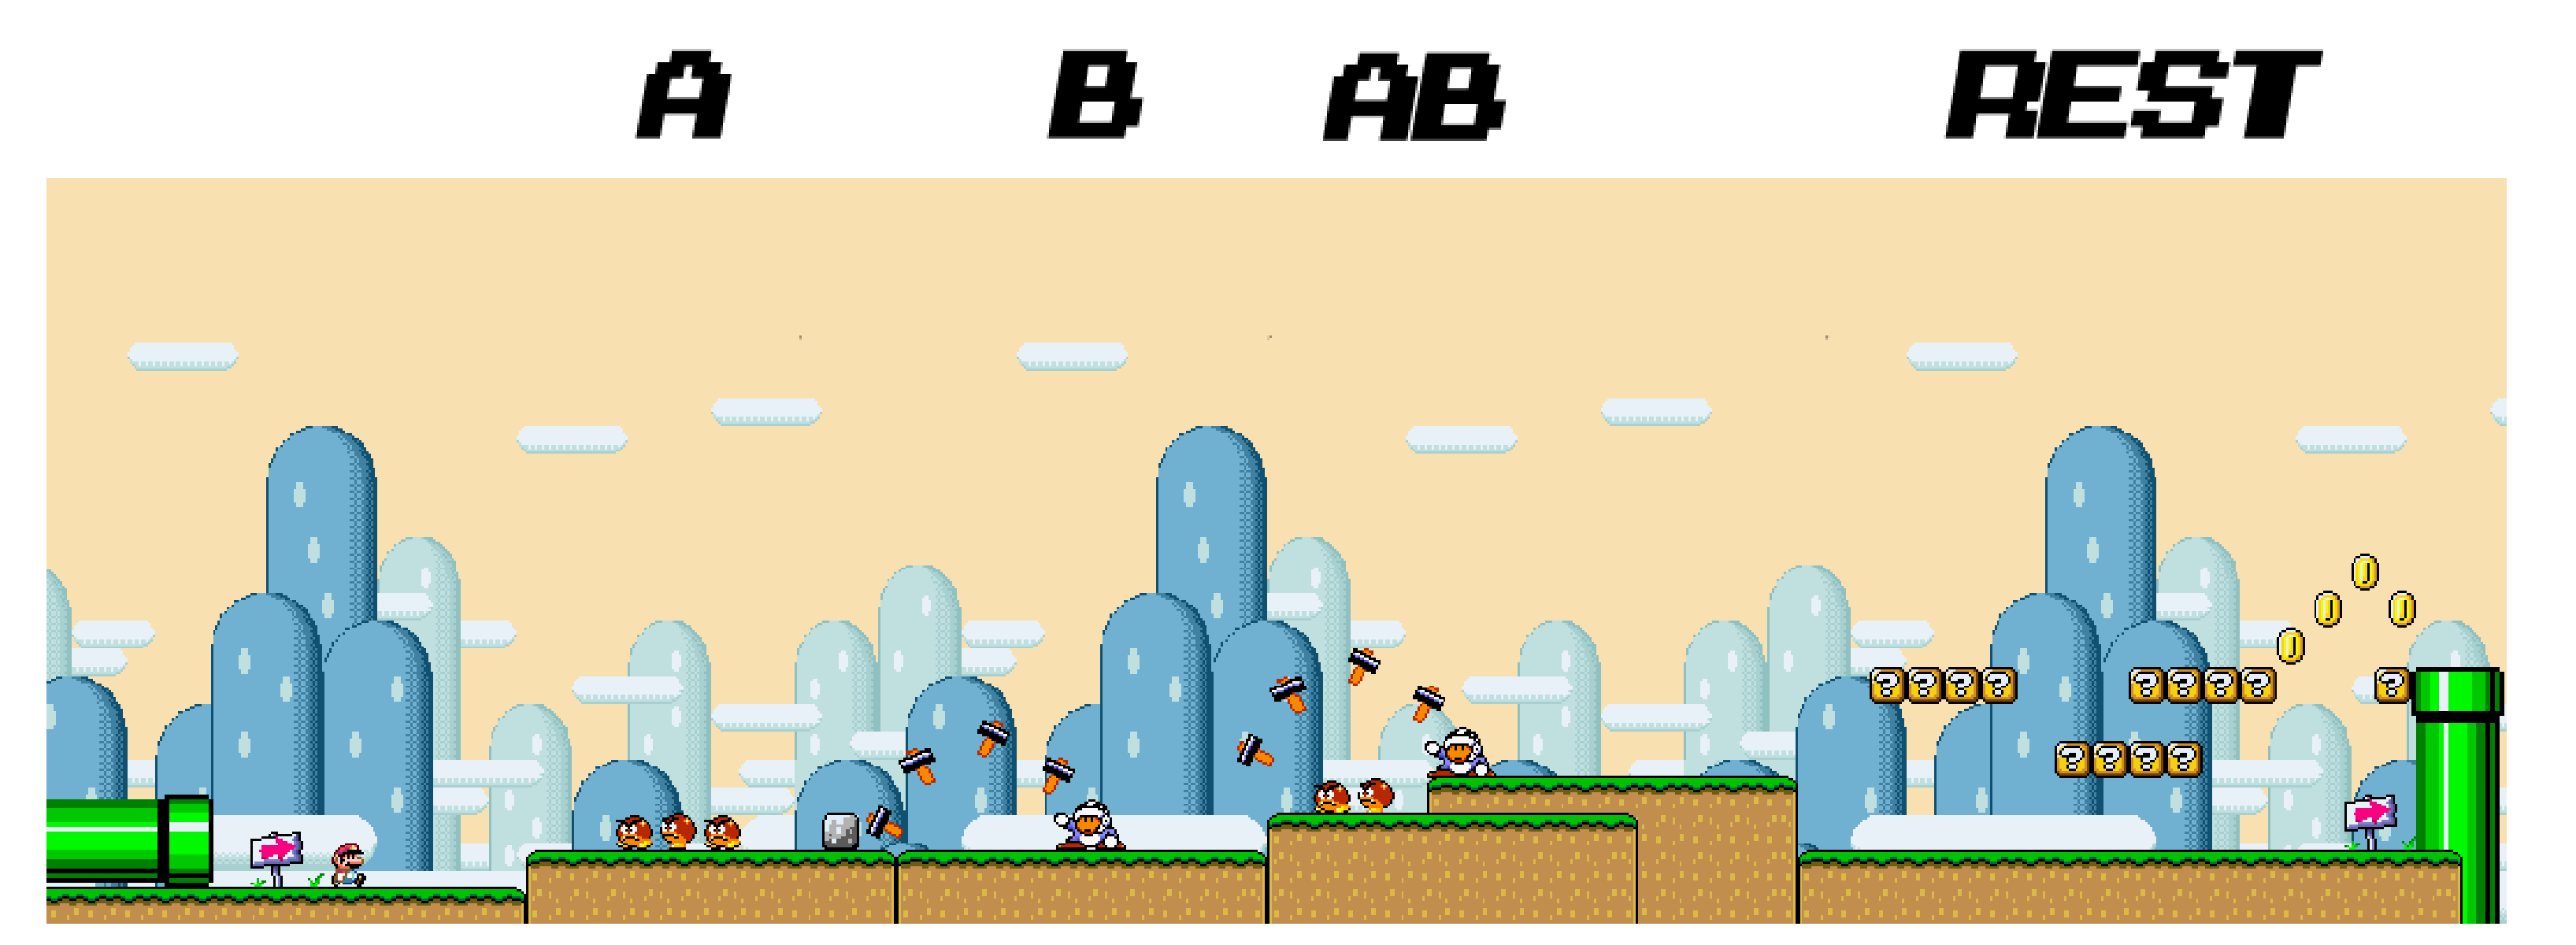
Mario starts on the left side of the image and wants to run all the way to the right side. On the way, he encounters the Ramped Setups we created out of Archetypes.
A – Three Swarmers on a flat plane. (Note that it’s not restricted to a single instance of the Archetype.)
B – The player must approach the Ranged enemy, wait till there’s a gap in the hammers, and run through.
AB – Adding height to this setup allows me to present both the Ranged and the Swarmer at the same time. The player now has to wait for an opening and then time a jump to avoid or stomp the Swarmers.
REST – Optional coins and power-up blocks along a segment of nonthreatening flat ground.
The player then goes down the green pipe and ends up in the underground section below (the left-most pipe is the segment start).
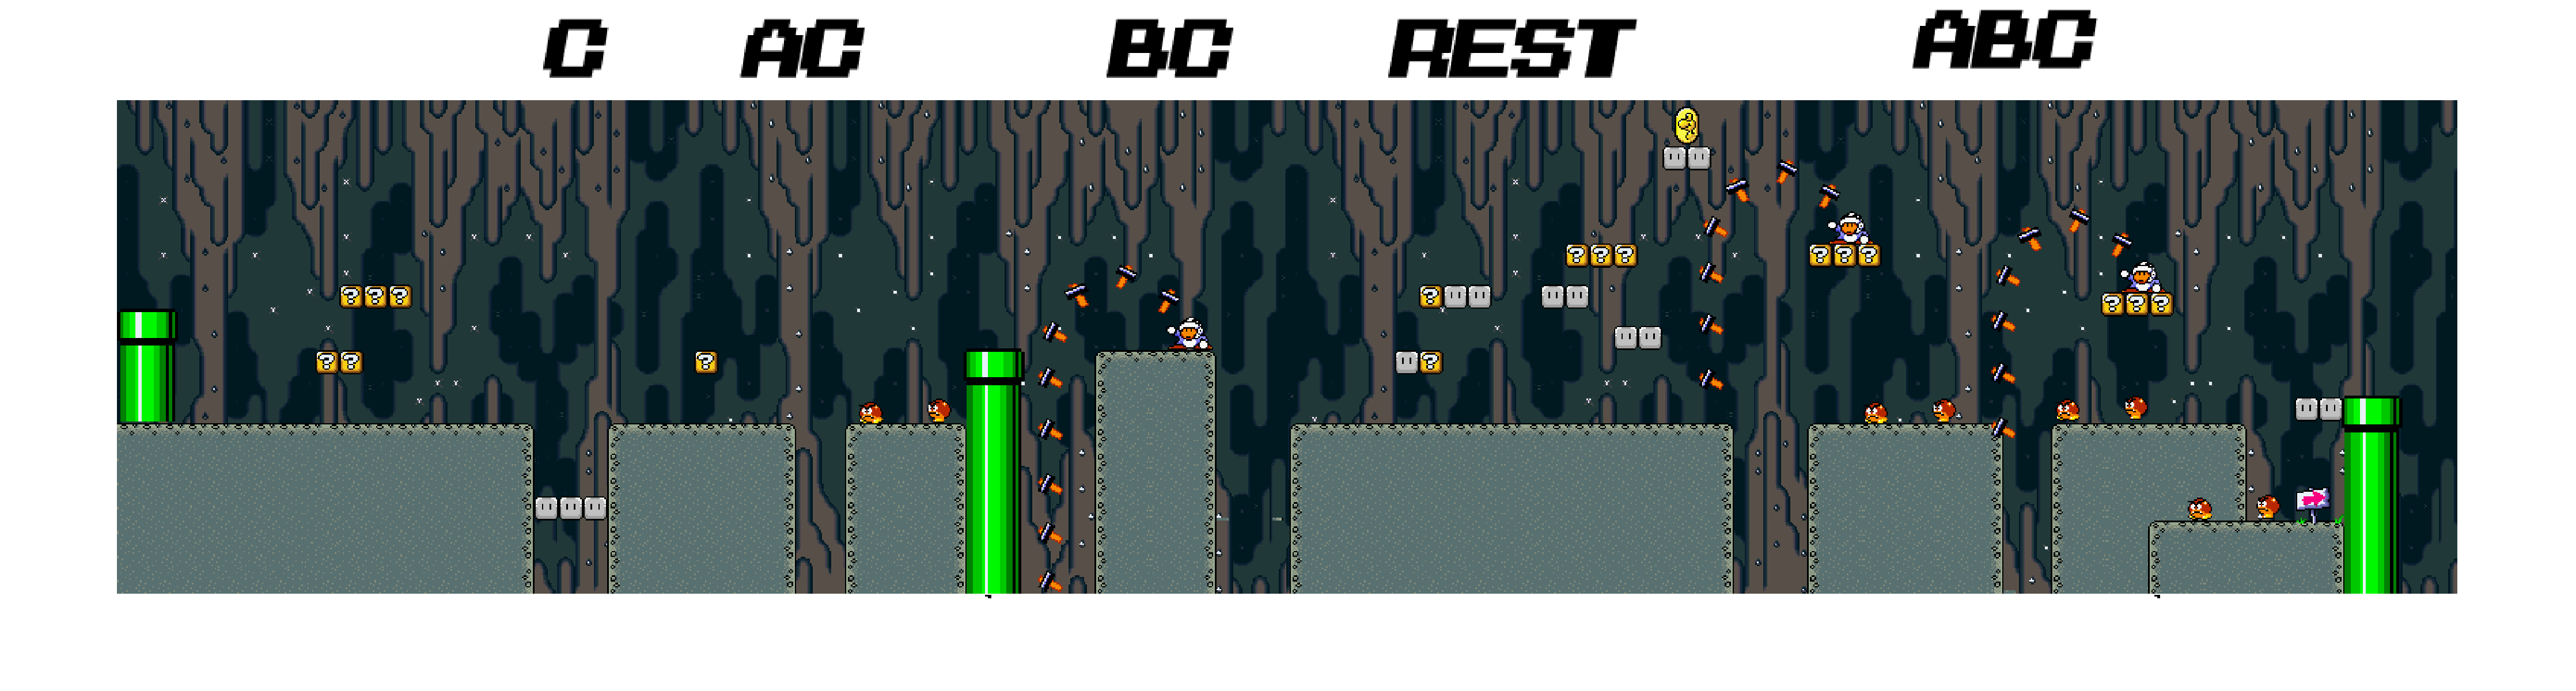
C – Jump over a gap. Since this is the first one, I’ve put blocks below so the player doesn’t die.
AC – Swarmers patrol the far side of the gap, so the player has to time a jump to avoid or stomp.
BC – The player has to time a jump between the gaps in the hammers, then time a jump over the Ranged (or time a stomp).
REST – A large coin “hidden” up off the screen, along with some power-up blocks on flat terrain
ABC – All of the challenges are here together. Additionally, players can only stomp the first Ranged if they climb up and get the “Secret” large coin from the rest area.
Conclusion
In this article we went over a trick that I use to create Ramps. Next article we’ll be combining Ramps into Paths, and Paths into Levels. After that, we should have enough information for us to “zoom out” again (two articles from now) and begin to talk about the reasons why I call this series “Trinity.”
Appendix
Originally I wanted to write an analysis of the puzzle game The Talos Principle to demonstrate how this kind of pacing shows up out in the real world, but I ran out of time to do a full write-up of it this week.
I did, however, make some images and a few notes, so I wanted to include those here in case people can get anything out of them.
First Six Puzzles (Training)
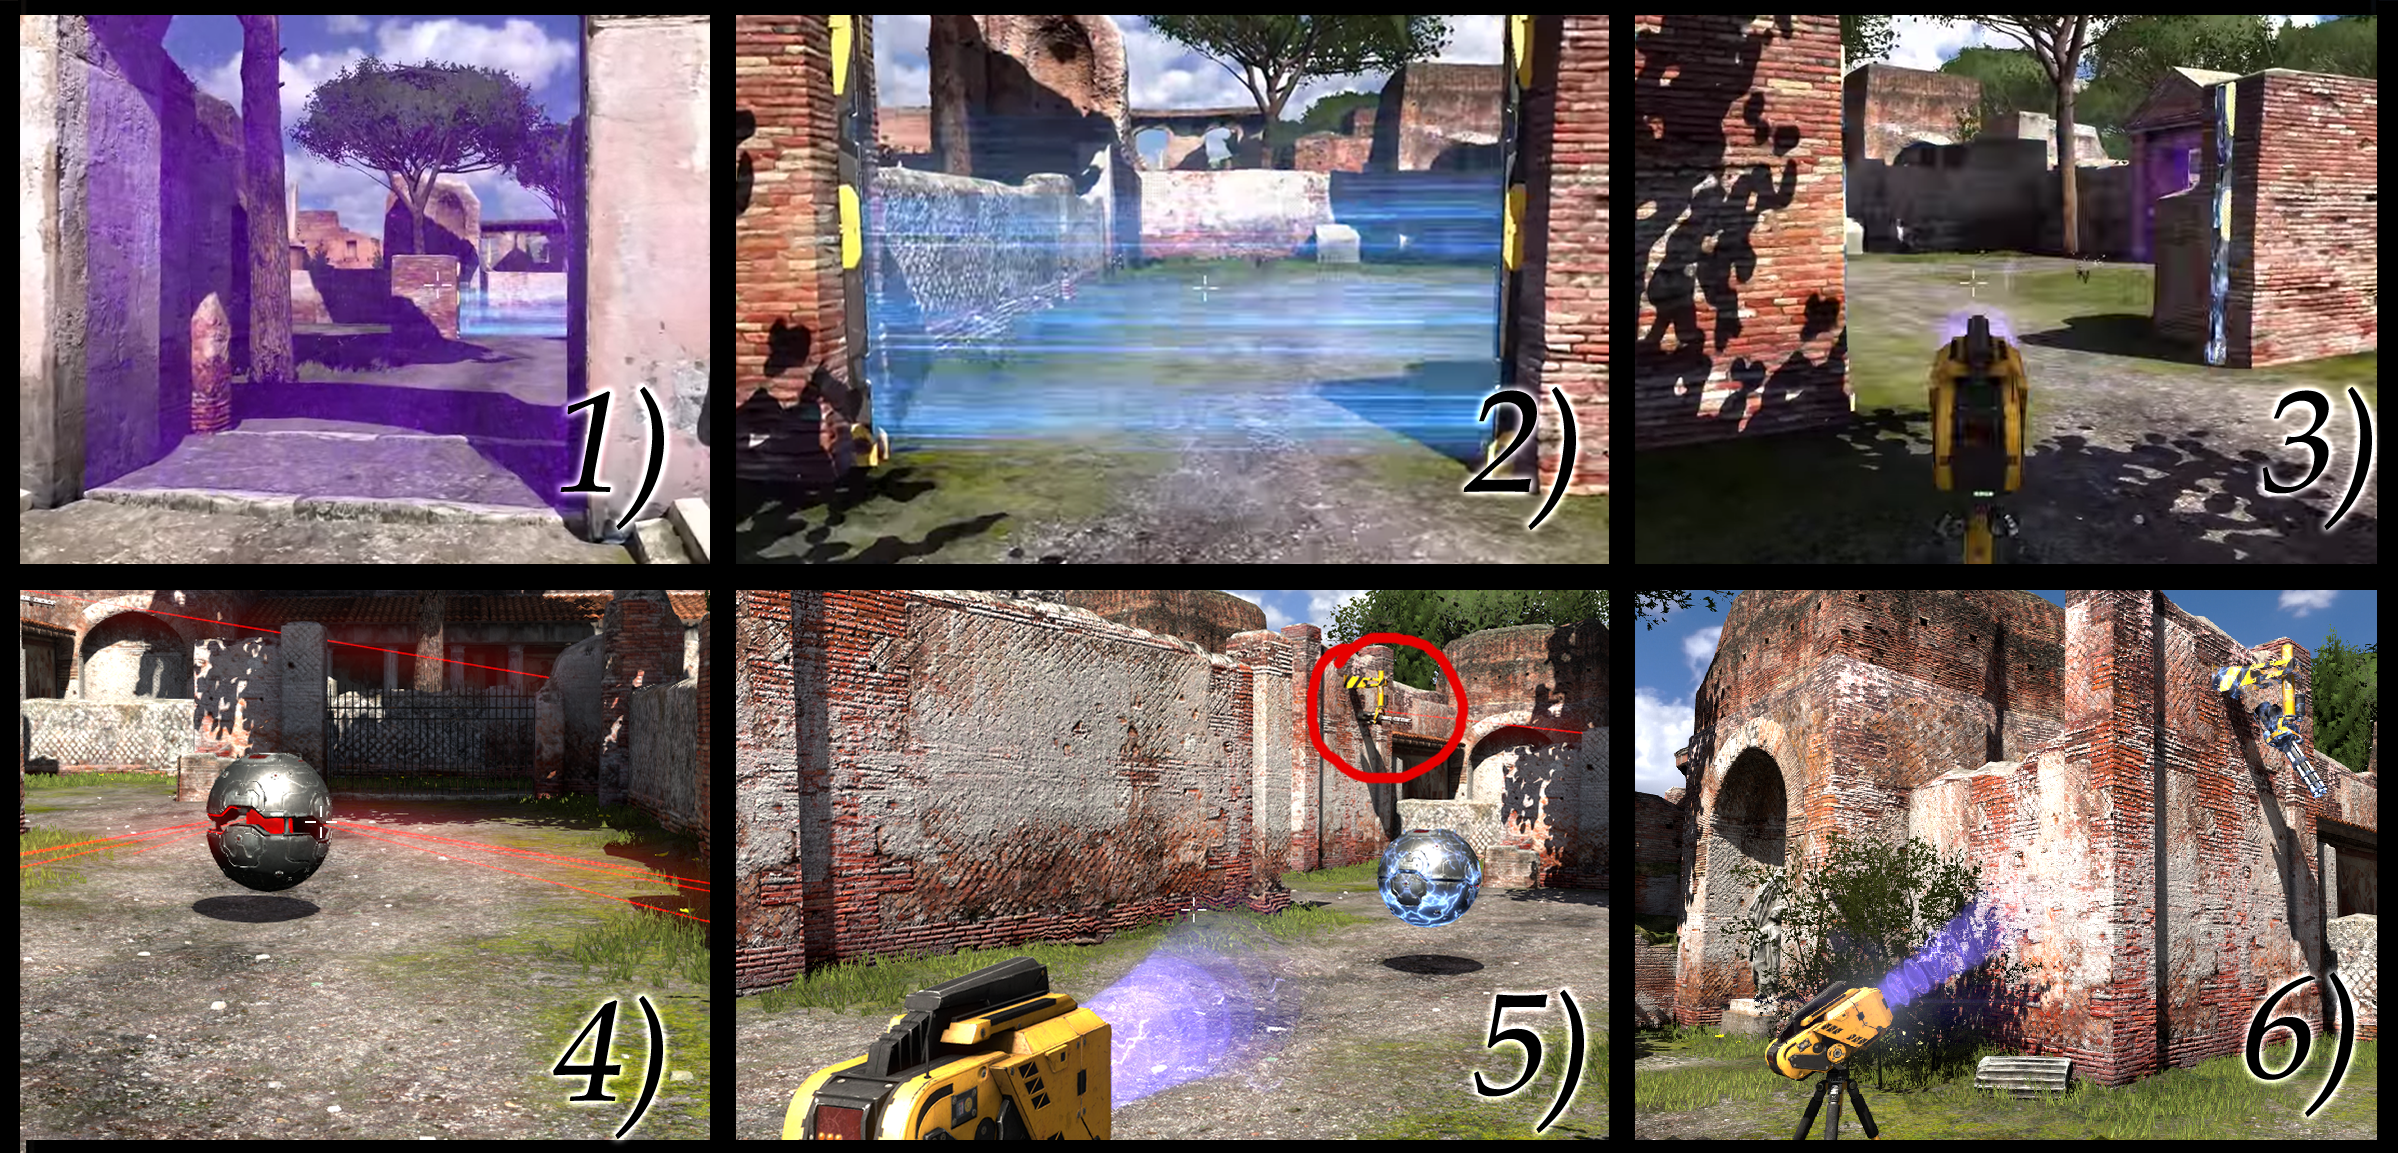
- Learn that there are force fields you are allowed to walk through.
- Learn that there are force fields you can NOT walk through.
- Learn to use a Jammer to disable the force-field so you can get past it.
- There are dangerous mines that patrol on a path.
- The Jammers work on them, too (the circled thing is a Turret).
- The Jammers work on Turrets TOO!
They introduced all the elements in training. When you’re done with that, the next puzzles begin to overlap all the elements (I only finished diagramming the first puzzle)
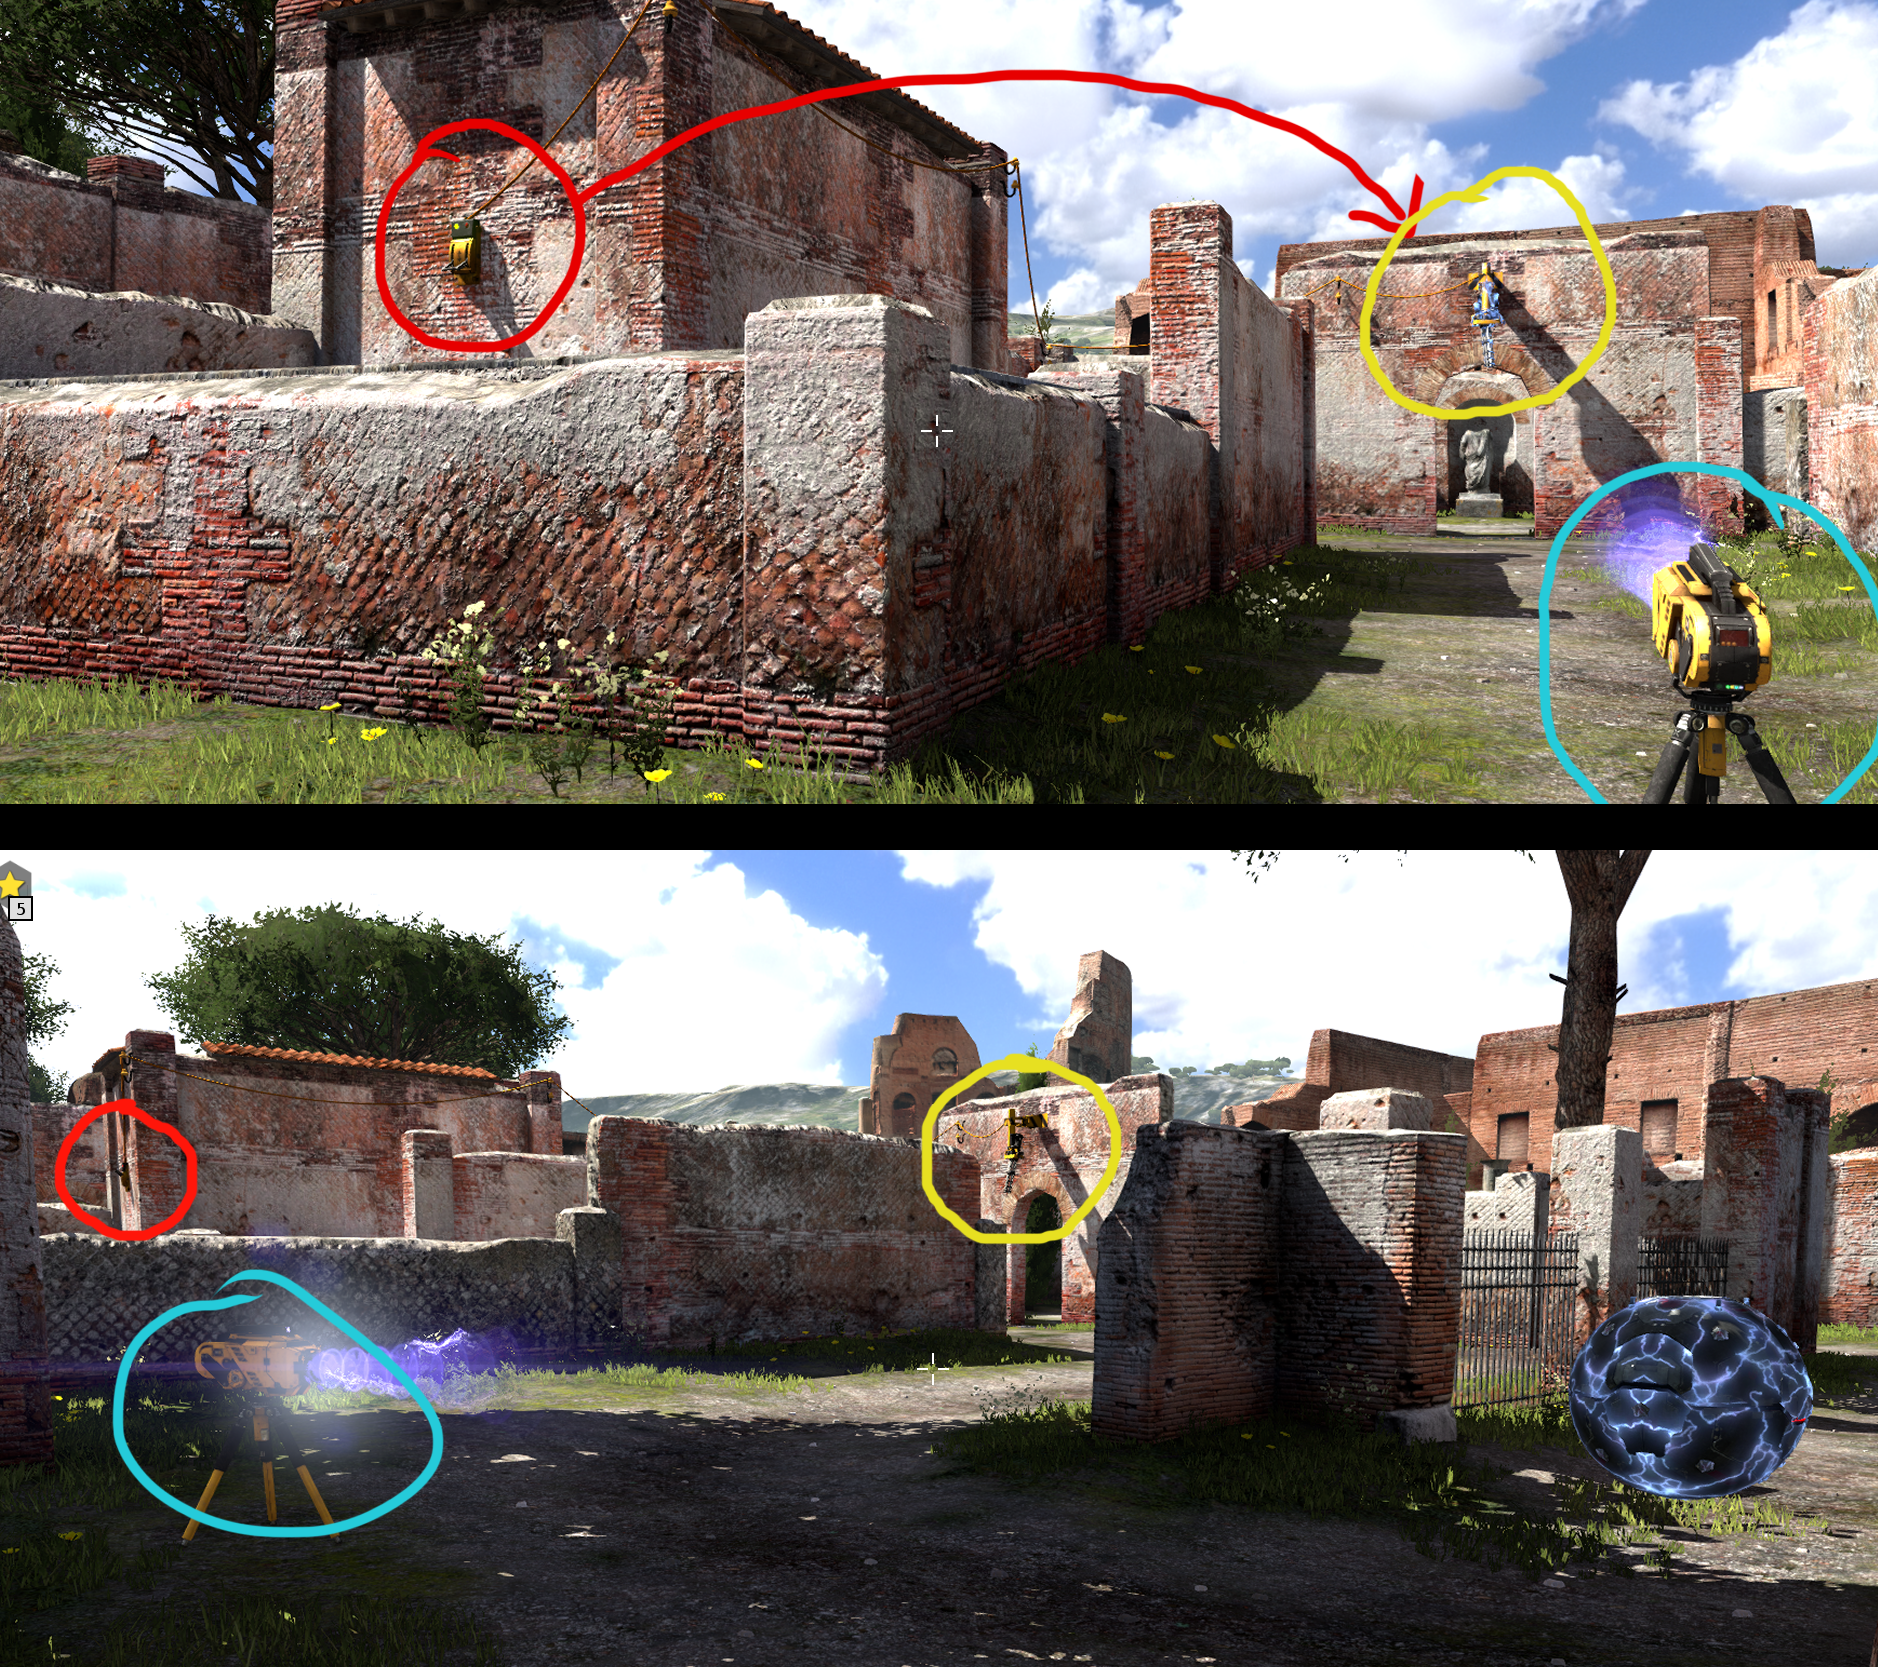
Upper: Use the Jammer (cyan) to block the Turret (yellow) so you can turn it off with a switch (red).
Lower: Now that the Turret is off, use the same Jammer to jam the Mine (bottom right), then win.
Patreon Credits
As always, these articles wouldn’t be possible without my supporters on Patreon: (http://www.patreon.com/mikedodgerstout):
Champions
Petrov Neutrino
Guardians
Martin Ka’ai Cluney
Patrons
Ryan Auld
Genevieve Pratt
Jesse Pattinson
Nikhil Suresh
Teal Bald
Vincent Baker
Benefactors
Justin Keverne
Ben Strickland
Mad Jack McMad
Oliver Linton
Katie Streifel
Annie Mitsoda
Supporters
Margaret Spiller
Jason VandenBerghe
The Yuanxian
Backers
Kim Acuff Pittman
Karl Kovaciny
Neal Laurenza
Christopher Parsons
Matt Juskelis
Mary Stout


1 Comment Already
Leave a Reply
You must be logged in to post a comment.
Awesome article. Thanks for taking the time to put together this information on game development. I’m currently starting pre-production on a new game project (indie) and thought it might be good to do a little research. I’m so glad I did only it seems I might have opened a can of worms. That is, I can see now that I have a lot to read and understand if I want to be successful.
Valerie