Setups
Review

This is one part in a series of articles that attempts to explain how I think when I design. The purpose of these articles is not as much to provide a hands-on practical approach – just to explain how I do stuff. Once I finish this series, I’ll focus on some more practical applications.
(Link to previous article) | (Link to next article)
Important Point from a Previous Article
Principle #1: As a game designer, your job is to ask your players Questions. The players’ job is to answer those questions using the Tools you give them.
Last Time
Last time we identified major weapon, enemy, and terrain Archetypes – some of which we will use in this article.
This Time
We’re going to talk about how I use the combat Archetypes we made in the previous article to create a series of enemy “Setups.”
Note: We’ll talk about how I chain setups together with increasing complexity to form “Ramps” in the next article.
Archetypes
According to Google, an Archetype is “a very typical example of a certain person or thing,” and that’s how I want to use the term here, but with one difference:
Archetype: A very typical example of one of the extreme boundaries of your game’s design.
In the following diagram, each of the black dots represents an Archetype. You can see how they all exist at the extreme boundaries of our enemy’s possible powers (Health, Range, and Damage).
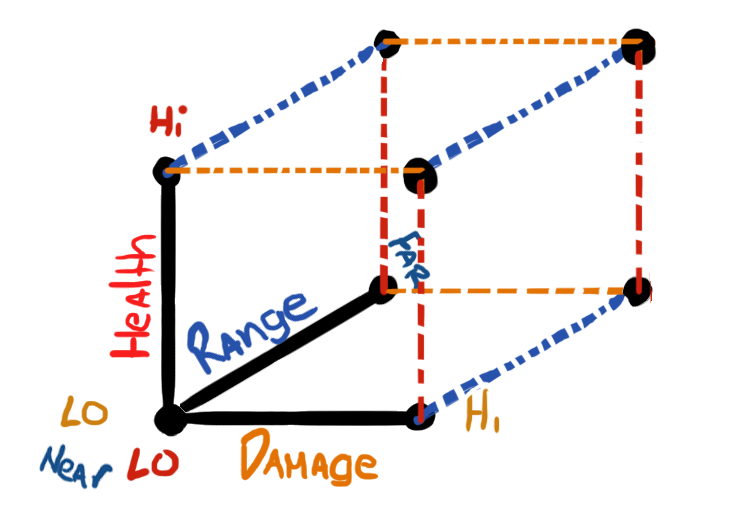
Note: If these diagrams don’t make sense, check out the last few articles – that’s where we created these.
A lot of people ask me why I choose only the extremes, and don’t make “jack of all trades” type enemies.
According to Principle #1, our job is to ask players Questions. It’s vital that the player understand what question they’re being asked, otherwise I’ve made it impossible for them to play my game the way I want them to play it (if at all). The closer you get to the extremes of your design space, the clearer players will be on what they’re being asked to do: an enemy that takes 10 hits to kill is MUCH different than one that takes 1, or 5 hits to kill, and so prompts a different response from the player.
Example Archetypes
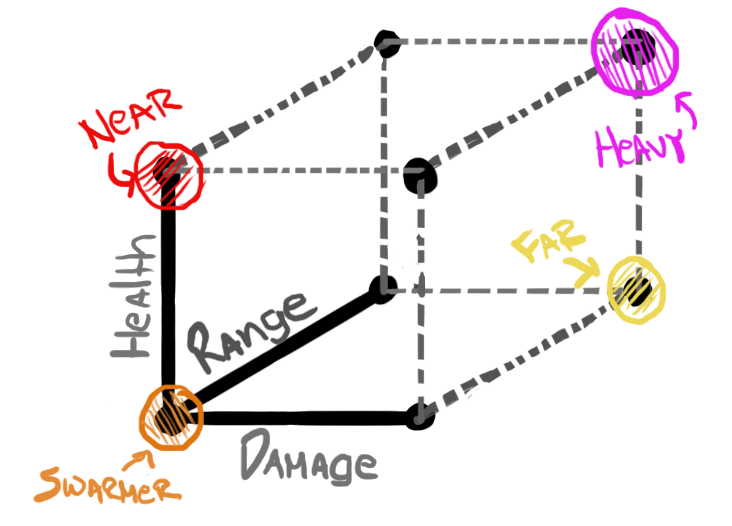
I’m going to use four enemy Archetypes, three weapon Archetypes, and all four terrain Archetypes that we went over in the previous two articles. I hope to show how these 11 Archetypes, as representatives of the extremes of your design space, work together to create a series of Questions and Tools that you can ramp up in difficulty over the course of a Path. (We’ll go over Ramps and Paths in later articles).
Enemies
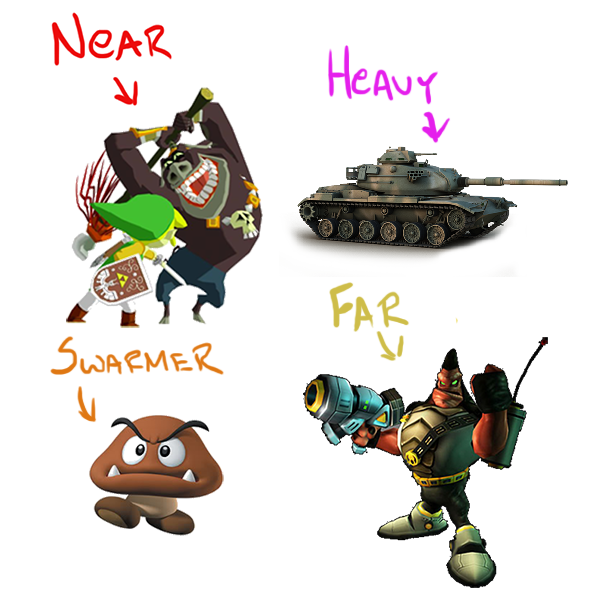
Four enemy Archetypes:
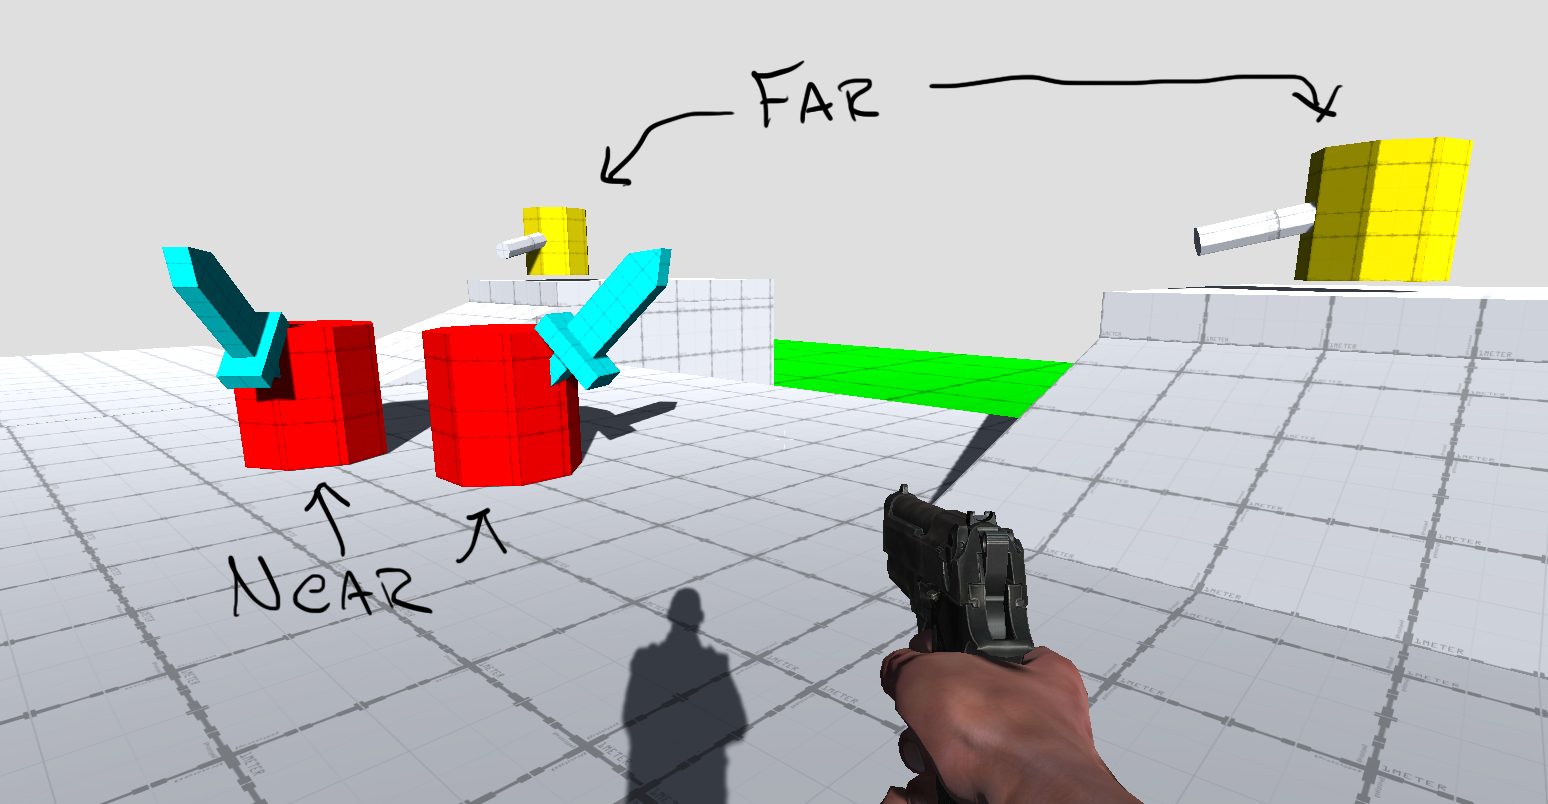
- Swarmer – Low Health, Low Damage, Close Range
- Heavy – High Health, High Damage, Far Range
- Far – Low Health, High Damage, Far Range
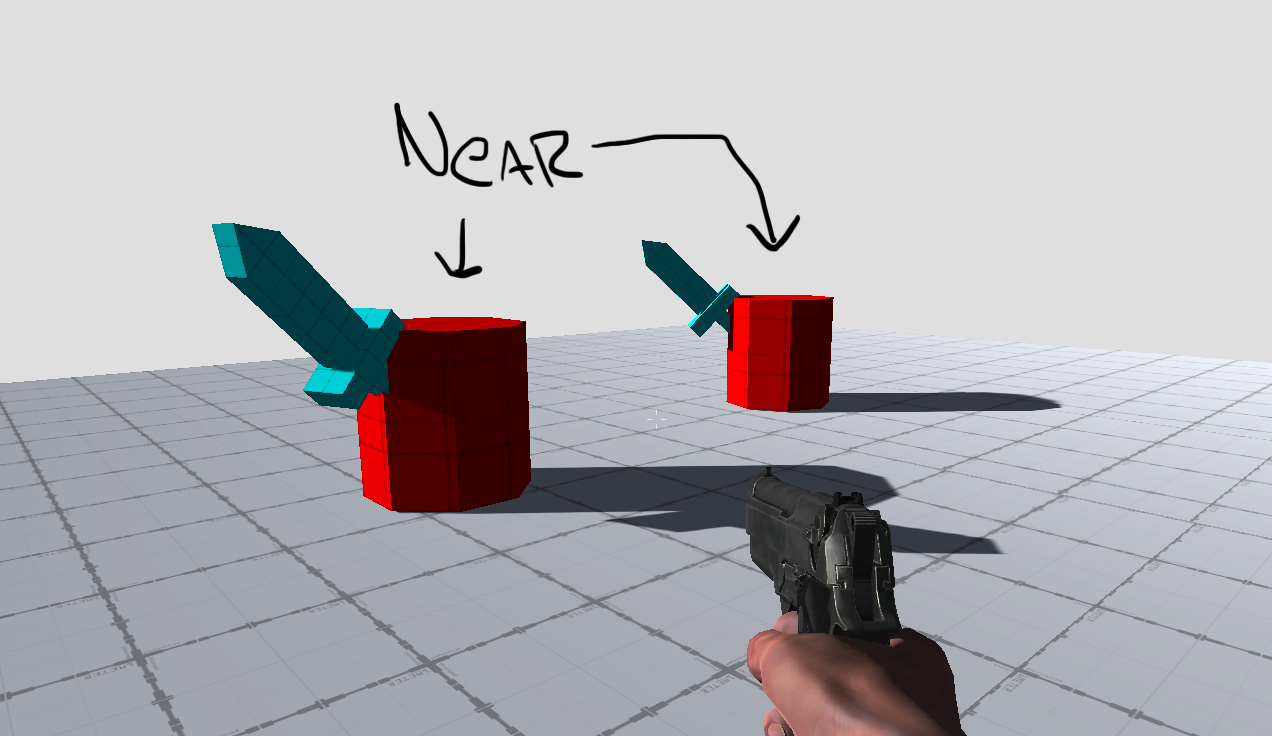
- Near – High Health, Low Damage, Close Range
Weapons
Three weapon Archetypes:
- Blaster – Long Range, Direct, Low Damage
- Flamethrower – Short Range, Direct, High Damage
- Bomb – Short Range, High Damage, Indirect.
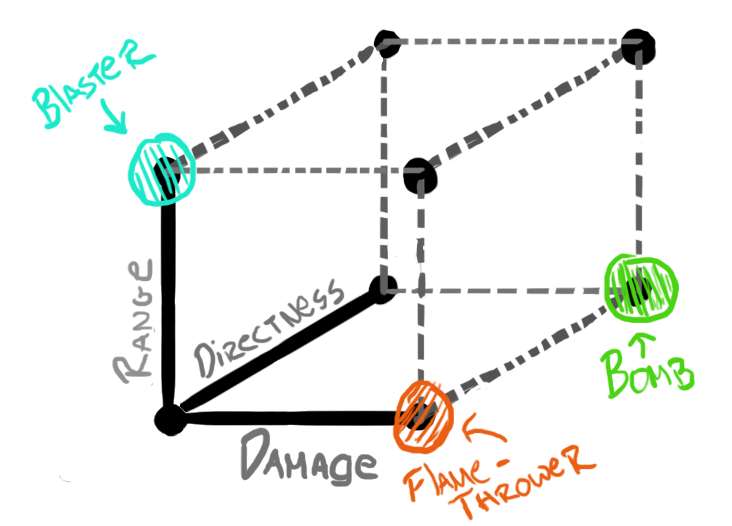
I chose these three as examples because they overlap very nicely with the terrain and enemy archetypes, as I’ll show you later in the article.
Terrain
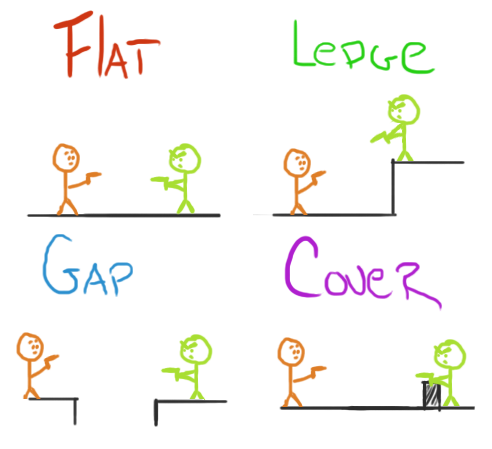
Four terrain Archetypes:
- Flat
- Gap
- Ledge
- Cover
Creating an Enemy Setup Using Archetypes
An enemy Setup is just a variously sized group of enemies of different Archetypes, placed on varied terrain. Each Setup should ask the player a question. In the combat system we’re creating, every setup asks the same two questions: “Who do you want to attack first and what weapon will you use to do it?”
For example, using the Example Archetypes from above:
Simple Setup:
[2 Near enemies on flat ground]
Who do you want to attack first?
This setup is basic. It doesn’t really matter which enemy the player attacks first (except that the player may wish to shoot the closest one or target both).
What weapon will you use to do it?
The bomb or flamethrower may be able to hit both for high damage, so the blaster isn’t as great in this area.
Combined Setup:
[2 Near enemies on flat ground backed up by 2 Far enemies on ledges.]
Who do you want to attack first?
The player has to dodge high-damage shots from the Fars while fighting the Near enemies. Because the Far enemies have low health, the player might normally attack them first — but in this case, the ledges they’re on make them less accessible than the two nears. You can see how these questions begin to overlap to create options for the player to choose a weapon.
What weapon will you use to do it?
The two near enemies have lots of HP, so you’ll want to hit them with the flamethrower or the bomb. The far enemies have little HP, but are inconvenient. The player is encouraged to use a weapon like the bomb (area damage) or the blaster (range) to take them out.
Note: If we had ammo in this system, the weapon choice could be even further influenced by how much ammo players have left for each gun when they arrive at this setup.
Complex Setup 1:
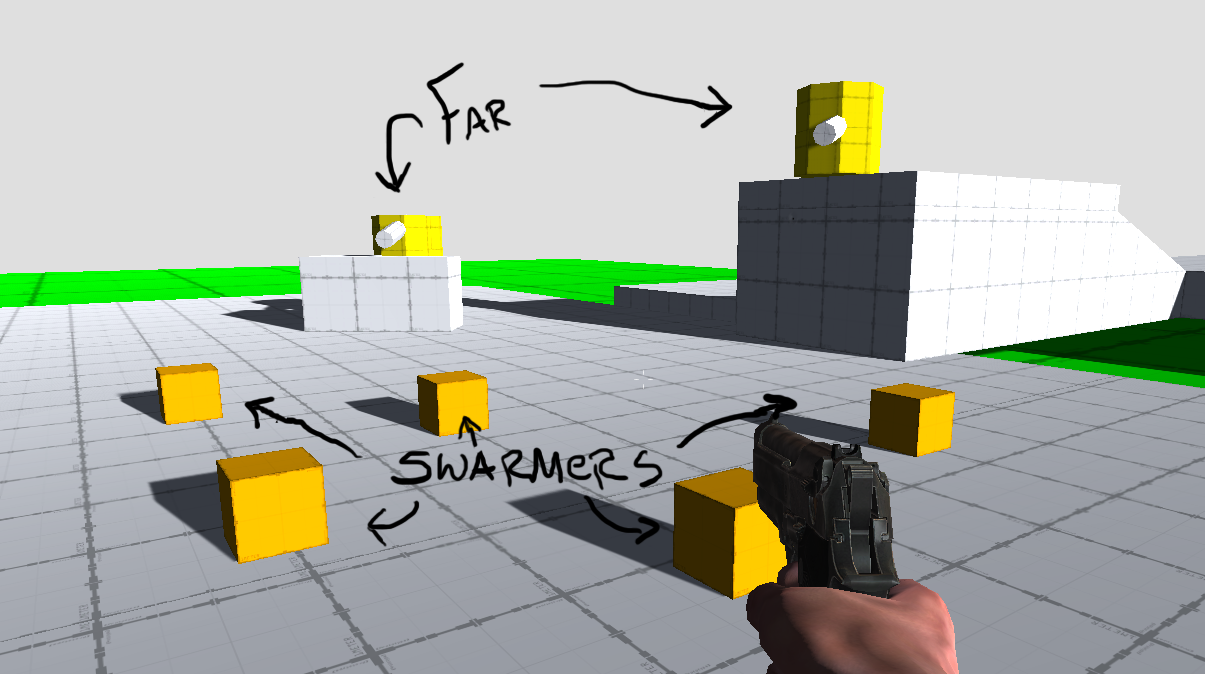
[5 Swarmers backed up by 1 Far enemy with cover and 1 Far enemy on a ledge.]
Who do you want to kill first and what weapon will you use to do it?
I combined the two questions here because it’s starting to get difficult to describe the answer to one without considering the other.
Because they are small fast targets, Swarmers aren’t easily killed with the Blaster. The player would probably want to get all of them with the Flamethrower. The bomb might also be a good pick, if it has enough area of effect to get all the swarmers.
Half of the leftmost Far enemy is obscured, making him a harder target for the Blaster, while the one up on the ledge is exposed and would be an easy target for that weapon. The bomb is probably a good pick for the Far enemy behind cover – it can arc over the cover and there’s plenty of floor behind the enemy for the bomb to land and catch the enemy in its area of effect (assuming the bomb has that, of course).
You could use the bomb to attack the Far enemy on the right, but as there’s no wall near it and you can’t see the floor, so you’d have to be very accurate with a relatively inaccurate weapon. The blaster is probably best there.
Complex Setup 2:
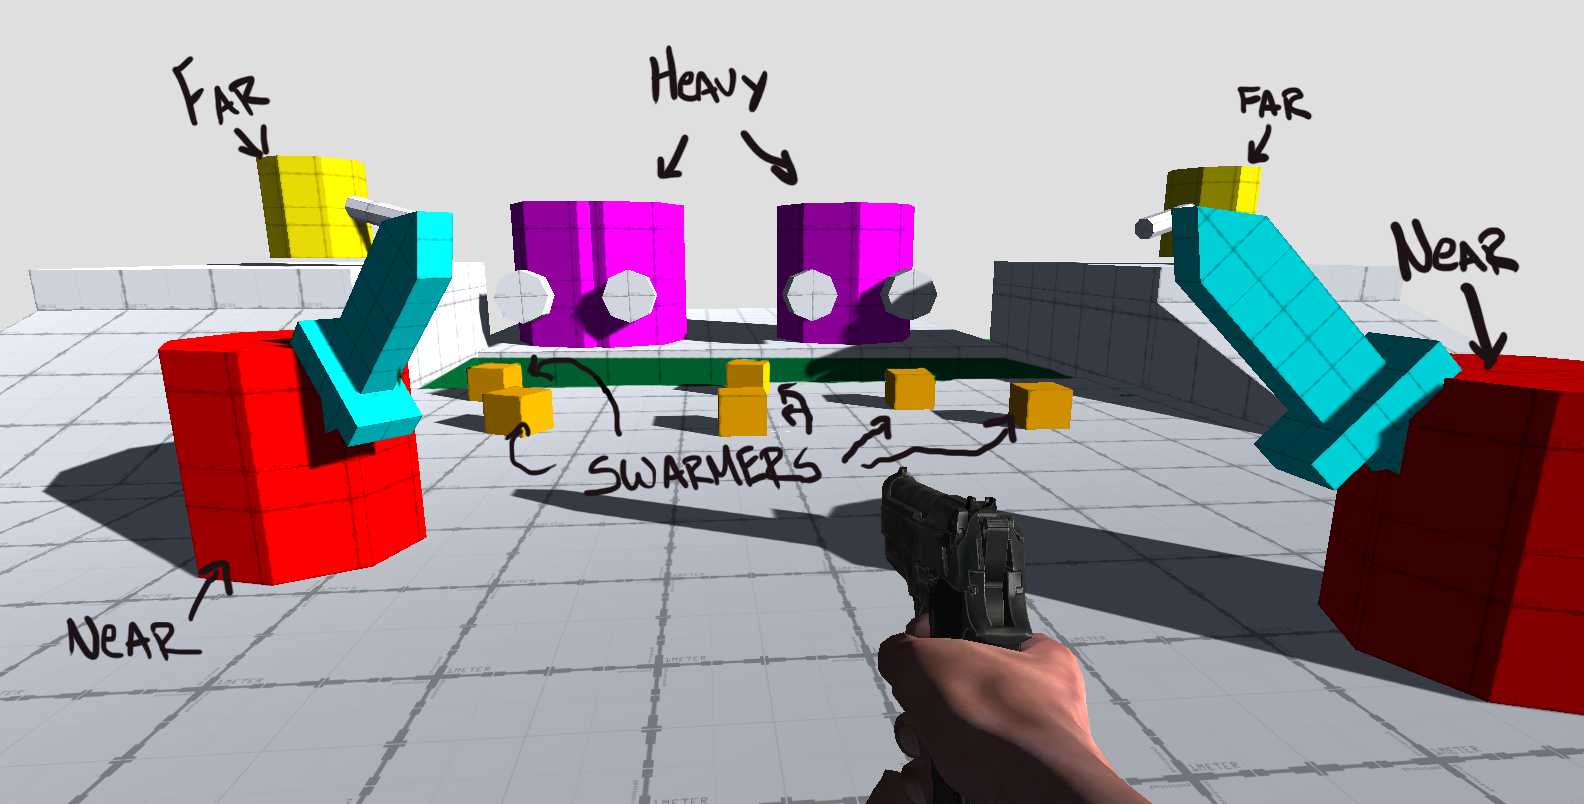
[5 Swarmers on flat ground in front of 2 Heavies across a gap. Between you and the swarmers are 2 Near enemies. 2 Far enemies stand on ledges shooting down at you.]
Who do you want to kill first and what weapon will you use to do it?
Personally, I’d whip out the Flamethrower and try to take out the Nears and the swarmers, then switch to the blaster to wipe out the Fars. Then I’d run up on the ledge where one of the Fars are standing and fire bombs down at the heavies – but you can see how many options have arisen from these 11 simple tools.
Conclusion
Once you understand your game design’s extreme edges (which we’ve been working on for the last few articles) you can begin to define archetypes for the various parts of your game like enemies, weapons, terrain, and so forth.
By combining the archetypes together, like using letters to form words, you end up with a complexity and depth of meaning that defies the simplicity of the method.
Next Time
If this time we created words out of letters, the next article will be about making sentences out of the words. We’re going to discuss the concept of Paths, and I’m going to demonstrate some of the tricks I use to pace setups along these Paths.
Patreon Credits
(http://www.patreon.com/mikedodgerstout)
Champions
Petrov Neutrino
Guardians
Martin Ka’ai Cluney
Patrons
Scruff
Genevieve Pratt
Jesse Pattinson
Nikhil Suresh
Teal Bald
Vincent Baker
Benefactors
Justin Keverne
Ben Strickland
Mad Jack McMad
Oliver Linton
Katie Streifel
Annie Mitsoda
Supporters
Margaret Spiller
Jason VandenBerghe
The Yuanxian
Backers
Kim Acuff Pittman
Karl Kovaciny
Christopher Parsons
David Weis
Matt Juskelis
Mary Stout


Leave a Reply
You must be logged in to post a comment.